

You can buy an expensive webcam and still look terrible on camera.
Bad lighting will do that.
On the other hand, a relatively basic webcam with good lighting can produce a surprisingly polished stream. That’s why lighting is one of the first things I’d improve before spending serious money on a new camera.
The good news is that you don’t need a professional photography studio or six lights surrounding your bed.
You need to understand what the light is doing to you on camera.
Once you get that right, everything else becomes much easier.
Why Lighting Matters So Much for Camming
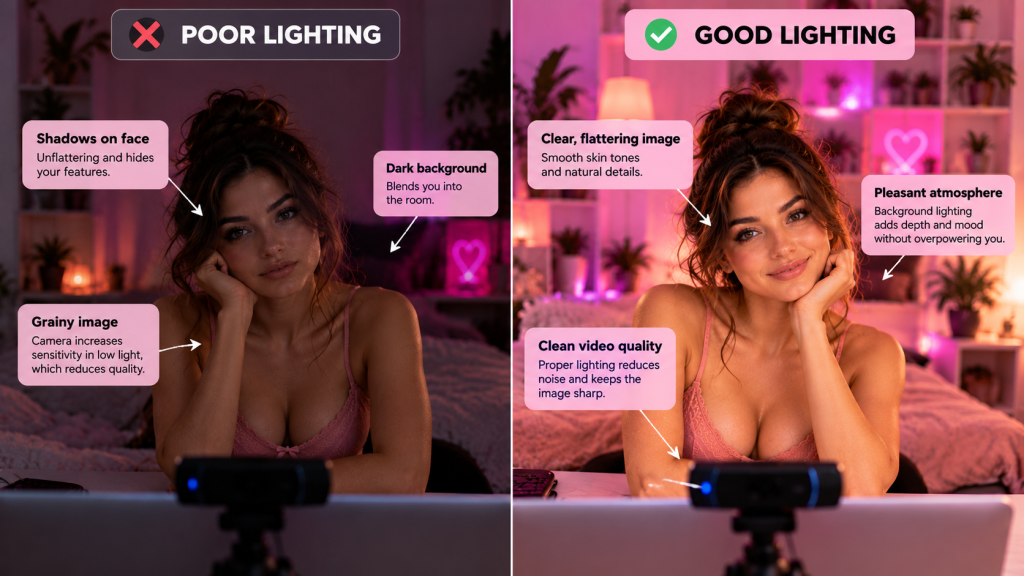
Your camera needs light to create a clean image.
When there isn’t enough light, the camera compensates by increasing sensitivity and exposure. That’s when you start getting noise, grain, blurry movement and generally ugly-looking video.
Good lighting helps your camera produce a cleaner image while also giving you much more control over how you look.
It can soften shadows, define your face and body, separate you from the background and create the atmosphere of your room.
Most importantly, good lighting makes your stream look intentional.
And that doesn’t necessarily mean bright.
A dark, moody room can look fantastic if you’re properly illuminated inside it. The problem isn’t darkness itself. The problem is having too little useful light on the subject.
In this case, that’s you 😉
Start With One Good Key Light
Forget complicated studio diagrams for a minute.
If you’re building your first lighting setup, start with one good light.
This is your key light.
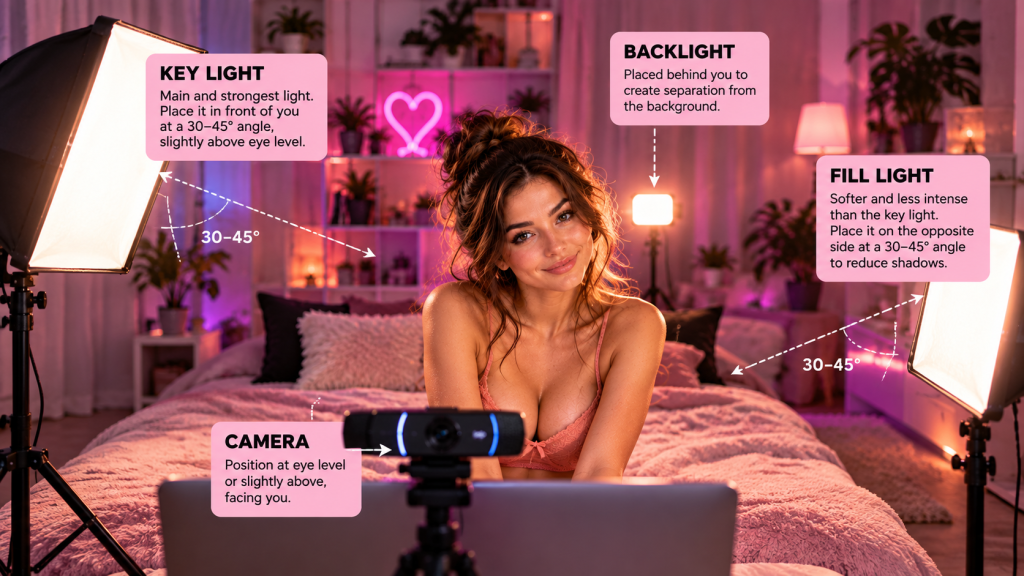
Place it in front of you and slightly to one side, usually around a 30 to 45-degree angle from the camera. Positioning it slightly above eye level and pointing it down toward you is a good starting point.
Then look at your camera preview.
Move the light.
Raise it.
Lower it.
Move it closer.
Move it farther away.
Watch what happens to your face and body.
There isn’t one magical angle that works for every person and every room. Your goal is to find a position that gives you flattering light without creating ugly shadows.
Soft Light Usually Looks Better
One of the easiest ways to make lighting more flattering is to make the light source appear larger and softer.
A tiny bright bulb can create hard shadows and emphasize every little texture.
A larger diffused light produces softer transitions between highlights and shadows.
That’s why softboxes, LED panels with diffusion and similar lights are popular for video.
A ring light can also work, especially in a small space, but you don’t necessarily need one.
In fact, don’t assume that ring light = good lighting.
A ring light directly in front of your face can produce a very flat look. That may be exactly what you want, but moving a soft light slightly to one side can often create more dimension.
Experiment.
Your camera preview is more useful than somebody else’s perfect lighting diagram.
Do You Need Three-Point Lighting?
No.
Three-point lighting is useful, but it isn’t mandatory for camming.
The classic setup consists of:
Key light: your main and strongest light.
Fill light: a softer light used to reduce shadows created by the key.
Backlight: a light positioned behind you to help separate you from the background.
It’s a proven setup and can look great.
But a beginner doesn’t need to buy three studio lights before going live.
Start with one good key light.
If the shadows are too strong, add a fill.
If you blend into the background, add a backlight or some background lighting.
Build the setup because you can see a problem that needs fixing, not because a diagram says you need three lights.
Add a Fill Light If You Need It
Once your key light is positioned correctly, look at the shadow side of your face and body.
Too dark?
That’s where a fill light can help.
Place a softer light on the opposite side of the key light. It should generally be less intense than your key.
The goal isn’t to eliminate every shadow.
Some shadow creates shape and depth.
You’re trying to prevent one side of you from disappearing into darkness while maintaining a natural-looking image.
If your fill is as strong as your key, everything can start looking flat.
So start low and increase it gradually.
Use a Backlight for Separation
A backlight is positioned behind you and aimed toward you, often from above or from one side.
Its job isn’t primarily to illuminate the room.
It helps visually separate you from your background.
This can be particularly useful if you have dark hair against a dark wall or your outfit is similar in color to your background.
You don’t need an enormous studio light for this.
A relatively small light can create a subtle highlight around your hair or shoulders and give the image more depth.
And if you don’t like the traditional studio look, you can use practical lights in your room to achieve a similar sense of separation.
Your Background Lighting Matters Too
Your room is part of the image.
A common mistake is concentrating entirely on lighting yourself while leaving the background looking like a black hole.
You can use lamps, LED strips, small accent lights or other practical lighting to give your background some depth.
This is also where you can introduce color.
Pink, purple, blue, red or warm amber lighting can completely change the atmosphere of your stream without turning your skin the same color.
That’s an important distinction.
Use neutral or flattering light on yourself, then use color in the background.
If you blast your entire face with a saturated purple LED because it looks cool in your room, your camera may produce some very strange skin tones.
Let the background create the mood.
Let your key light make you look good.
Pay Attention to Color Temperature
Not all white light is actually the same color.
Some bulbs produce warm yellowish light. Others produce cooler blue light.
This is measured as color temperature.
The exact number isn’t something you need to obsess over as a beginner. What matters more is avoiding an ugly mixture of completely different light sources.
For example, imagine you have:
a warm yellow bedside lamp,
a cool white LED panel,
and daylight coming through the window.
Your camera now has to figure out what “white” is while three different colors of light are hitting the scene.
Skin tones can start looking weird very quickly.
Try to keep the main lights illuminating you reasonably consistent.
If your light allows you to adjust color temperature, experiment until your skin looks natural on camera.
Set Your White Balance
This one gets ignored surprisingly often.
Your camera uses white balance to determine how colors should look under different lighting conditions.
Automatic white balance can work well, but it can also change while you’re streaming.
You move.
The screen changes.
A colored light becomes more visible.
Suddenly your skin shifts from warm to cool and back again.
If your camera software allows manual white balance, try setting it after you’ve finished arranging your lighting.
You don’t need to understand professional color science.
You just want your skin to look like your skin.
Don’t Mix Every Color in the Rainbow
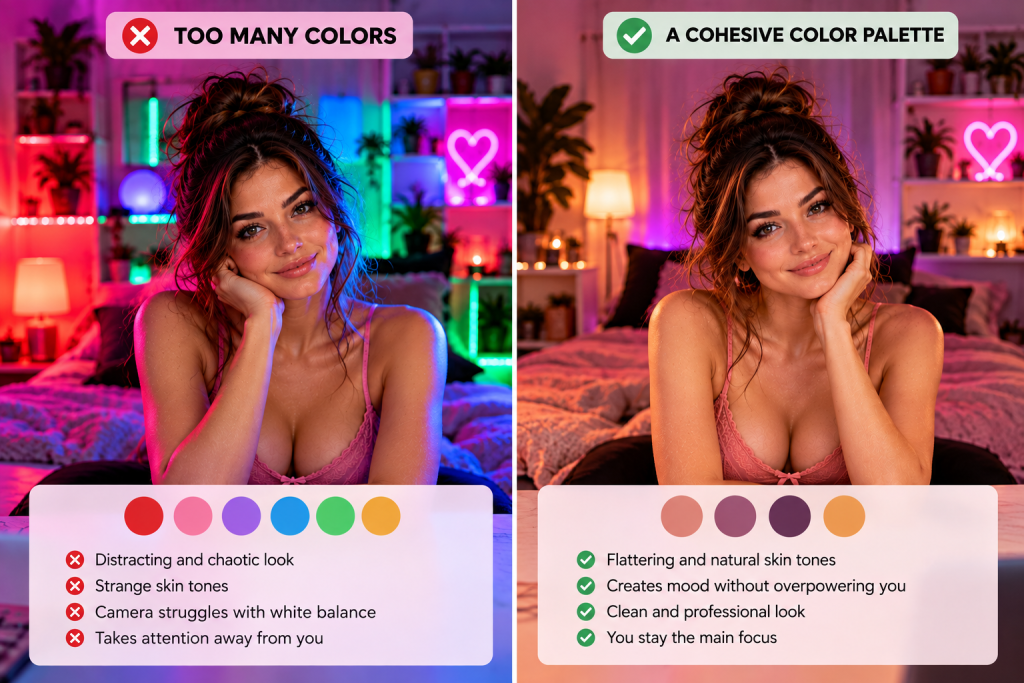
RGB lights are fun.
And they’re very easy to overdo.
Pink wall.
Blue lamp.
Purple LED strip.
Red sign.
Green keyboard.
Suddenly your room looks like a gaming PC exploded.
Pick a general color palette.
Two complementary background colors are often more effective than throwing six colors into the frame.
Remember that you should still be the focal point.
The lighting is there to support the show, not become the show.
Avoid Relying on Overhead Lighting
A ceiling light directly above you is rarely the most flattering primary light source.
It tends to create shadows under the eyes, nose and chin.
You can keep it on if it contributes useful ambient light to the room, but I wouldn’t rely on it as your main light.
Put your key light in front of you.
Your face will thank you.
Natural Light Can Look Amazing
A window can be one of the best lights you own.
And it’s free.
If you stream during the day, try positioning yourself facing a large window or sitting at an angle to it.
Indirect daylight can produce beautiful, soft light.
Avoid putting the window directly behind you unless you’re intentionally creating a silhouette. Your camera may expose for the bright window and leave you looking extremely dark.
There’s one obvious disadvantage to natural light.
It changes.
Clouds move. The sun moves. Evening arrives.
If you need a consistent setup that looks the same throughout a long stream, artificial lighting gives you much more control.
There is also a privacy consideration. Be careful about what viewers can see through windows and what your surroundings might reveal about your location.
What About Reflectors?
Reflectors are still useful, but they’re optional.
A reflector bounces existing light back toward you. That means you can soften shadows without adding another powered light.
White reflectors produce relatively soft, neutral fill.
Silver reflectors create a stronger reflection.
Gold reflectors add warmth, although I’d use them carefully for video because they can push skin tones too far.
You also don’t necessarily need to buy a photography reflector immediately.
A large white surface can bounce light too.
Again, start simple.
Ring Light vs Softbox
This is probably one of the most common lighting questions.
Neither one automatically wins.
Ring Light
A ring light is compact, easy to position and simple to use.
It can work particularly well for closer framing and smaller streaming spaces.
The characteristic circular catchlight in the eyes can also look nice.
The downside is that front-facing ring lights can create fairly flat lighting and reflections may become visible in glasses or shiny surfaces.
Softbox
A softbox can create a larger, softer source of light and gives you more flexibility in how you shape the image.
It can look more natural and dimensional when positioned off to one side.
The downside?
It takes up space.
If you’re camming from a tiny bedroom, having two giant softboxes sitting beside your bed may get annoying very quickly.
Choose based on your room and the kind of framing you use.
LED Panels Are Another Good Option
Modern LED panels are useful because they’re relatively compact and many allow you to adjust brightness and color temperature.
Some also offer RGB modes.
For camming, that flexibility can be extremely useful.
A panel can work as your key light, fill light, backlight or background accent depending on where you put it.
If you’re working in a small room, compact LED lighting can be much easier to live with than traditional photography equipment.
Don’t Put the Light Too Close
Moving a light closer makes it appear larger and softer relative to you, which can be flattering.
But there’s a limit.
If the light is extremely close or too bright, you can blow out highlights and lose detail in your skin.
If you’re looking pale, washed out or glowing like you’ve just encountered a UFO, turn the brightness down or move the light farther away.
Watch your camera preview.
Your eyes adapt to brightness much better than a camera does.
Check Exposure on Your Camera
Lighting and camera settings work together.
If your image looks too bright, the answer isn’t always moving your lights.
Your camera may be overexposing the image.
Likewise, if everything looks dark, your camera settings may be part of the problem.
If your webcam software gives you exposure controls, experiment with them.
Try to avoid forcing the camera to compensate for an extremely dark room. Longer exposure can create blurry movement and an unnatural-looking stream.
Give the camera enough light first.
Then fine-tune the settings.
Don’t Forget About Glasses
If you wear glasses on cam, lights can create annoying reflections across the lenses.
You may need to move your key light higher, farther to one side or change its angle.
Don’t immediately remove your glasses if they’re part of your look.
Move the light first.
A few inches can make a surprisingly big difference.
A Simple Beginner Lighting Setup
If you’re starting from scratch, don’t overcomplicate this.
Try:
1 key light in front of you and slightly to one side.
Then add:
1 softer fill light if the shadows are too strong.
And optionally:
1 small background or backlight to create separation and atmosphere.
That’s enough to build a very good-looking cam setup.
You can always add more later.
A Better Setup When You’re Making Money
Once camming is producing consistent income, you can start refining things.
Maybe you upgrade to a larger soft key light.
Add adjustable LED panels.
Create better background lighting.
Use a dedicated hair or backlight.
Add smart lights so you can change the mood of the room during your show.
The point is the same as upgrading your webcam.
Don’t buy equipment just because professional equipment exists.
Upgrade when you know what you’re trying to improve.
Test Your Lighting Before Every Stream
You don’t need to rebuild your room every day.
But take 30 seconds and look at your camera preview before going live.
Is your face properly exposed?
Are there strange shadows?
Did somebody move one of your lights?
Is the background too bright?
Is a window suddenly visible?
Does your skin tone look natural?
Fixing these things before the stream is much easier than noticing them two hours later.
The Best Lighting Setup Is the One That Makes You Look Good
There’s no universal perfect setup.
Three-point lighting works.
A single large softbox can work.
A ring light can work.
Window light can look beautiful.
A couple of inexpensive LED panels can produce a surprisingly professional stream.
What matters is the image coming out of your camera.
Start with one good light.
Position it properly.
Soften it if necessary.
Add fill or background lighting only when you need it.
Keep your skin tones natural and use colored lighting to create atmosphere rather than drowning yourself in RGB.
Most importantly, test everything through your actual camera.
Because your viewers aren’t standing in your bedroom looking at your expensive lighting setup.
They’re looking at the pixels it produces. 😉
[…] still putting together the hardware side of your setup, start with our guides to choosing a webcam, lighting your cam room and choosing a microphone for […]
[…] lighting guide for webcam models goes deeper into key lights, fill lights, backlights and […]